zaterdag 14 september 2013

Onam Special: Ghee Rice


WE WISH YOU ALL A HAPPY ONAM 2013!!
Rajani & Ilse


This is no doubt one of the exotic rice dishes that brings out the quality of the home made Ghee and the Basmati rice, King or Queen of the rice.
I have hardly had anyone say no to Ghee Rice, even though its very rich in ghee (clarified butter)
A rice dish that is made for occassions like a festival or a birthday, using only ghee. 16 September is Onam 2013 and
this dish fits perfectly in the Onam lunch or dinner.

When I prepare this dish my entire neighbourhood would get the aroma of the ghee, the basmati rice and the whole spices & I have often got remarks like: "woman what are you cooking we get so hungry!"
Yes, that's exactly what this rice dish will do to you as it brings out its exotic qualities .....
Try this out, it takes no time and you will LOVE it....


Ingredients:
1 cup Basmati rice
2 cups of hot water
Juice of half a lemon
3 cardamom pods
4 cloves
2 sticks of cinnamon
A pinch of Saffron soaked in a tab. sp. of hot water
A handful of cashewnuts
Half a handful of raisins
2 to 3 tab. spoons of Ghee
1 tsp. salt
A heavy pan ( i use the cast iron / Dutch oven)
A cotton/ woolen quilt


Method:
Wash & soak rice in cold water for half an hour and drain this well in a colander.This rice needs to feel and look dry.

In the mean while heat a heavy pan and add the ghee.As the ghee begins to melt on a medium flame add the cashewnuts and as it turns light brown add the raisins, the whole spices(cardamom,clove & cinnamon) & then the rice.


Using a wooden spoon gently stir the rice making sure every coral is coated in ghee and let the rice get fried on a medium flame for 3 to 5 minutes stirring just a few times.

Then add the hot water, saffron water, lemon juice and the salt .Again gently stir the rice and turn the flame to high and let it cook/ boil for 5 minutes.


Afer the rice has been boiling for 5 minutes on a high flame lower the flame, give it a final stir ,clover the pan with its lid and immediately place it on a quilt and pack it well allowing no part of the pan exposed and place a heavy object on top.


See how well the rice is cooked ..all in a quilt......the whole process took less than 10 to 12 minutes.


Done! that's it ...Can it get any easier?
Remember your rice is being further cooked so do not open until it's time to
serve.


Tips:
  • Rice remains hot for hours if u follow this and remember you are using less electricity or gas....
  • If you have a large wooden box you can line this box with an old blanket and place the rice inside this box.
  • When I make boiled rice I use this method. Even after 4 to 6 hours I am able to serve HOT rice.
  • Buy a cast iron / Dutch oven vessel specially to make rice items. They are expensive but they are life long pans!.
  • Don't your neighbour give you a good smile passing by......smelling the aroma of Ghee Rice you have just made?
  • Please leave a message if you tried it!

donderdag 5 september 2013

Sheera / Khesari

As a kid I never liked this sweet dish.It was only recently I had started tasting it.
I made this as an item for the Friday dinners and realised how everyone
liked it.
(I still have to like it though ;-).....perhaps its because i am not really fond of sweets)

However, I must say it's a very easy, sweet dish one could make & I could remember how my mum would slowly slip into the kitchen when we got unexpected guests and in no time serve the guests hot Sheera and coffee.

In Udupi, my home town, we called it Sheera or Khesari.The name Khesari was given perhaps because of the keser(saffron) which gave out a beautiful golden color to this dish.

This recipe is specially here for MANISHA Samal who's favourite dish it is & who has often asked me to teach her how to make it. Here you go...


Ingredients:

1 cup of rava / semolina /griesmeel (fine or medium fine)
1/2 cup of sugar
A handful of cashewnuts split
A handful of raisins
1/2 a cup of pineapple pieces
3 cloves
3 crushed cardamon pods
A pinch of saffron soaked in a tab. sp of warm water
A pinch of salt
3 cups of hot water
2 to 3 tab.sp of ghee


Method:
Heat a heavy bottomed pan and add 3 tab sp. of ghee (click to see how to make ghee).

Fry the cashewnuts &raisins until it turns slightly brown.

Now add the cloves and the rava/ semolina and fry on medium flame taking care not to burn the
mixture.

Make sure the rava is well coated in the ghee.

This will take about two to three minutes.

Add now the pineapple pieces, sugar & salt and mix well.

Add the hot water & the saffron and mix well. Close pan with its lid and
simmer for five minutes.

Then stir and simmer for another 5 minutes.
Sheera is done:)


Tips:
Serve this hot with ice cold mango pulp or even ice cream.
You can serve this hot or cold.

GHEE / Clarified butter


If you follow this method, Ghee is not difficult to prepare.
I have taught all my cookery students how to make ghee and they
have all told me they have succeeded in making good ghee after few failures.
So dont give up!

To make Ghee you need to buy the pure butter (in Dutch: roomboter).


Here we go:


Take a heavy pan and simmer the butter on a low flame for 10 to 15 minutes.

At some time you will have to almost close the pan with its lid to avoid the spluttering of the butter that begins to boil.

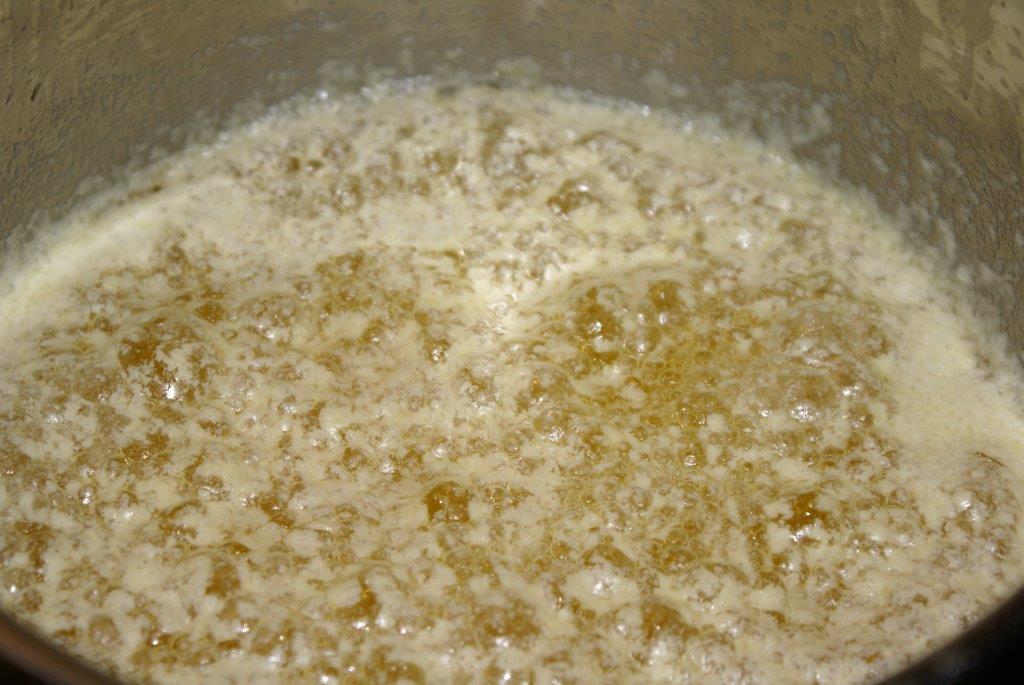
After 10 to 15 minutes it should look like this:


Then in another few minutes bubbles begin to form on top and this is when you
need to be careful as at this state the ghee can get burnt.


Finally when u see dark spots forming on the bottom & sides of the pan
turning brown you need to switch off the fire.
When the ghee is done, this is how the bottom of the pan will look:


Allow the ghee to cool for 10 minutes and strain & store in a clean air
tight bottle.


Tips:Ghee remains fresh for a longtime if kept in the fridge.
Hot rice tastes excellent just with a few drops of ghee on it.

Hope you succeed !...

donderdag 29 augustus 2013

Chicken/Meat Kebab


When I grew up chicken or meat was never a must in our daily food. However,  I
remember we had fish every evening for dinner as we lived close to the
seaside(Malpe). Meat was ment for guests so when preparations were made for a
chicken or meat curry often we were expecting guests..........

I have given up meat.... to be honest sometimes I have cheated by having the
rice part of the biriyani or the gravey of a chicken curry.But my husband
has compleately given up chicken or any meat so I dont cook any non
veg. Instead, we have as much fish as possible.

However, when we get guests at home I have made this recipe which has been
well appriciated by all.
Recently I made this when Viren had come to have dinner with us. One bite
into the kabab he asked me:"Aunty who made this? " When I told him I had, he
replied: "this is exactly how kebab shoul be" & I said to myself 'I have a
recipe for my blog!'

So try this out. Its simple and easy. You would have noticed & agree with me
by now that I use very few spices and herbs yet am able to bring out a
delicious dish.

Ingredients:
500 gms. of any minced meat /chicken

1 rusk or 1.4 cup of fine bread crums
5 cloves of garlic
Ginger (same amount as the garlic)
1 heaped tsp. black pepper powder
1 tsp.garam masala powder
1 tsp.turmeric powder
1/2 tsp.red chilly powder
Two handfull fresh coriander leaves
One handfull mint leaves
Juice of half a lemon
Salt to taste


Method: 
Grind to a fine paste the ginger, garlic,coriander & mint leaves.

To this add the chicken/meat mince & all the other ingredients and mix very
well.

Make round or oval shaped kebabs and shallow fry in a greased pan for
10 to 15 minutes on either sides.

Slice a kebab to check if meat is well
cooked.

Serve with mint or tomato chutney as a starter.

Enjoy!

Tips:No need to use extra oil to shallow fry the kababs as the minced meat
does give out a lot of fat when cooking.
Fry a mall piece of the kebab to check if it is salted well.
Make kebabs and deep freeze them by placing a layer of the baking paper to
avoid getting the kebabs sticking to each other.
Kebabs can be grilled on a BBQ or an oven.

donderdag 22 augustus 2013

Orange Lentil Curry (Dal)

Easy Dal Curry in minutes


I came to the Netherlands in 1984 and didn't know where to find the Toordal
or any other dal I could make a dal curry with. However, this one lentil caught my
eye at the Turkish store and ever since I have used only this dal for any
Indian curries I make. I discovered it cooks in no time & it's also a very
tasty lentil to make our Dal Curry.
I started this Rice & dal with courgette / Zucchini with my son when he was
4 months so also with Ilse & Marijn the two babies who I had baby sat when
they came to me as 3 months old babies.....Now they are all grown ups and
still come to me to have 'Dal & Rice".....
I had omitted the green chilly and the seasoning until kids were
older.

I am sure if you have tried this recipe you will agree with me that it is
the best dal...
It takes probably 10 to 15 minutes to make it and can be stored in the
fridge for another 3 to 4 days.
Always make sure, for the days consumption you take, just warm or steam the
required amount of the food and not heat the entire pan.This way the
food remains fresh for a few days in the fridge and you are not reheating
it.
Ingredients
Zucchini / courgette cut into pieces
1/2 tsp Turmeric powder
1 slit green chilly (option)
1 cup of Orange lentil (they do look like our masoor dal but its not the
same)
Salt to taste

Seasoning
1 tab.of ghee
2 cloves of garlic sliced into thin flakes
1 dried red chilly split
Juice of half a lemon

Method
Clean the Orange lentil in few changes of water & add 4 to 5 cups of water & allow to boil on medium flame.

Once it begins to boil I would remove
the white foam that forms on top of the simmering pan.

Then add the turmeric powder the green chilly and allow to cook on low flame
with the lid of the pan almost closed for 5 to 6 minutes.
By now it would have almost cooked


Add now the Zucchini / crougette & salt to taste and let it simmer for
another 5 minutes. 
Seasoning
Heat the ghee on low flame and fry the red chilly and the garlic flakes
until they are golden brown.Add this to the dal curry & add a tsp. of fresh
asefetida/ hing dissolved in water or a few pinches of powdered asefetida /
hing.

Asefetida dissolved in water


Orange lentil /dal is done.
Serve with rice or chapaties


Tips: One cup of this dal is sufficient for 6 persons.
If too thick add boilingwater to the dal curry.

Enjoy!

zondag 11 augustus 2013

Healthy Sandwich bread


Broodje gezond as the Dutch call it.


By now you would have noticed I am not focussing only towards south Indianfood. I want you to know the healthy and easy way to make a lunch or dinner, thus some simple recipes are also in my blog.


This is what I would take with to have it at lunch break when I was working.I dont work anymore but I still have them for lunch and I love every bite of it......Ask Ilse(my daughter) she will tell you how tasty this can be!


All you need is:
Two slices of brown bread (DON'T eat white bread)
Slices of tomatos
cucumber
few leaves of iceberg lettuce
pinch of salt & black pepper.
A bit of butter to spread on one of the slices (option)


Tips:
-Do not keep tomatos in the fridge.
They need to be kept in the roomtemperature.Try a tomato from the fridge and one kept outside & see the difference intaste. Any tomato grower will tell you this.

-How to have fresh bread every day: 
Buy a loaf of fresh bread and keep 2 to 4 slices outside(not in thefridge as bread gets dry)The rest of it put in sandwich bags and keep in the FREEZER.


When ever you need the slices take them out of the freezer and thaw it as shown. 
This will take 5 to 10 mts. By the time you have made your cup of coffee or tea or had your shower your bread is thawed..............This way u can have fresh bread in the morning and at lunch with any filling of your choice.


Try it out!.

zaterdag 3 augustus 2013

Green Mango Prawn Curry


A North Malabar curry I had learned from my mum's aunt Cheriyanjamma. A wonderful little lady who spent all her time in the kitchen making tasty food.......

Both my grandparents came from North Malabar from a place called Cherukunnu .However they both settled outside Kerala.This is how we landed in Udupi -Karnataka.


Ingredients:

1 kg. of fresh or frozen prawns
1 coconut grated or 1 large cup of desiccated coconut soaked in boiling water for half hour.
1/2 tbsp hot chilly powder

1 tbsp cumin powder
1/4 tbsp turmeric powder
2 green mangoes cut into small pieces
2 to 3 split green chillies
1/2 tbsp Mustard seeds
3 to 4 (large cloves) thinly sliced
A handful of fresh curry leaves
3 tbsp of coconut oil (if not available use sun flower oil)


Method:
Clean and devein the prawns & keep aside. Prawns need to be washed in a few changes of water to get rid of the sand in them.


Grate the coconut


Chop the green mangoes into small pieces and save the seeds to add to curry


Dry roast the coconut, cumin powder & the red chilly powder for a few minutes until you begin to get the roasted smell of the coconut.


Grind this to a fine paste adding half a cup of water & keep aside.
Add another cup of water to the grinder and use this to cook the mangoes with turmeric powder the slit green chillies and salt to taste. When the mangoes are cooked soft, add the prawns and cook for another 5 minutes on high flame.


Now add the coconut paste and let it simmer for another 5 to 10 minutes and then add the seasoning.

Take a small sauce pan and heat 3 tbsp of coconut oil. Once the oil is hot, switch off the flame and immediately add the mustardseeds and close the pan with a lid preventing the mustard seeds from popping (to pop) out of the pan.

When the mustard seeds stop spluttering, add the thinly sliced flakes of garlic and the curry leaves to it and bring it back to a medium flame. Fry until garlic turns golden brown. Now pour this on the prawn curry and stir well.


DONE! Serve with rice.


Tips:
This curry should be hot & sour & spicy.If you are not able to find green mangoes add juice of tamarind(the size of a lemon)Of course the taste will be different.
This recipe was chosen & published way back in 1981 in Eve's weekly


Enjoy!